Creating a New Distribution System Connection Setting
AdminStudio 2025 R2 | 30.0 | Application Manager
Application Manager is included with AdminStudio Professional and Enterprise Editions.
To create a new named connection to a distribution system, perform the following steps:
To create a new named connection to a distribution system:
-
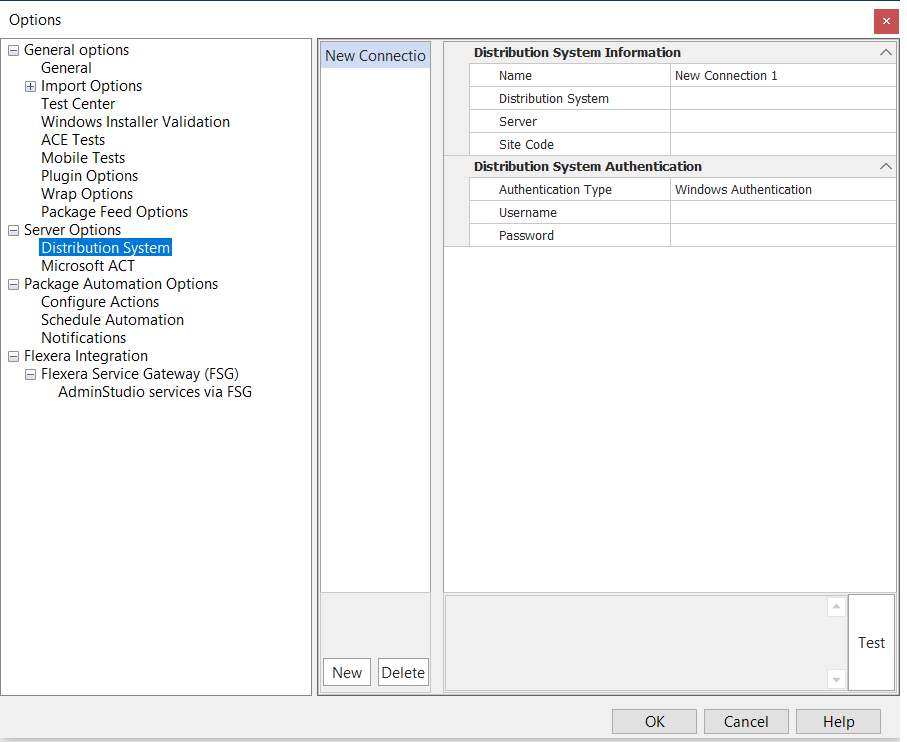
On the Application Catalog tab menu, select Options. The Options dialog box opens.
-
Under Servers Options, select Distribution System. The Distribution System tab opens, and lists all defined connections. 
-
Click New. A new set of empty connection setting fields is displayed.
-
In the Name field, enter a name to identify this new named connection to a distribution system.
-
From the Deployment Type list, select one of the following to identify the distribution system technology of this new named connection:
-
Workspace ONE Distribution Plugin
-
Altiris Distribution Plugin
-
App-V Server Distribution Plugin
-
Casper Distribution Plugin
-
Custom Distribution Plugin
-
Intune Distribution Plugin
-
ConfigMgr Deployment Plugin
-
XenApp Distribution Plugin
-
-
In the Server field, enter the name of your distribution system server.
-
In the Site Code field, enter the code that identifies your distribution system site.
noteIf you are creating a named connection to a XenApp, Altiris, or App-V server, leave the Site Code field blank. If you are creating a named connection to Casper, this field will not be displayed.
-
Under Distribution System Authentication, set the Authentication Type field to either Windows Authentication or Server Authentication to identify the authentication type you are going to use to access the specified distribution system. If you selected Server Authentication, you need to also enter a Username and Password.
-
Under Publish Location Information, set the Authentication Type field to either Windows Authentication or Server Authentication to identify the authentication type you are going to use to access the shared location where you will be publishing packages during distribution. If you selected Server Authentication, you need to also enter a Username and Password.
-
(Casper only) In the Distribution Point field, enter the Casper distribution point you want to distribute packages to.
noteCasper supports multiple server infrastructures, but AdminStudio only supports the File Share Distribution Points infrastructure, and copies packages to a UNC File Share Distribution Point in Casper. AdminStudio currently does not support copying packages to JDS Instances, Cloud Distribution Points, Software Update Servers, or NetBoot Servers.
-
(Custom Distribution Plugin only) Under Script Information:
-
In the Script File field, click Browse and select the script file (.ps1) that you want to add. This is an optional field.
noteIt is required that the specified PowerShell script file must be present in the AdminStudio installed machine.
noteThe specified PowerShell script file will be executed locally on the AdminStudio installed machine during publish.
-
In the Script Parameters, enter the parameters used in the PowerShell script with the appropriate AdminStudio placeholders. This is an optional field.
-
The Script Parameters field must be used to pass the AdminStudio placeholders value to the parameters in the PowerShell script file. During the execution of the script, AdminStudio will replace the specified parameters with the value of the placeholders for the package being published. The below Table lists all supported AdminStudio placeholders with their values.
-
-
Workspace ONE Distribution Plugin
Placeholders Values [ProductName] Name of the application node as it appears in the Application tree in the Catalog. [Vendor] Value of the Manufacturerproperty in thePackage Informationtab.[Version] Value of the Software Versionproperty in thePackage Informationtab.[PackagePublishPath] Path to the package file after the copy. [InstallCmdLine] Value of the Install command lineproperty in theProgramstab underDeployment Datatab.[UnInstallCmdLine] Value of the Uninstall command lineproperty in theProgramstab underDeployment Datatab.[Platform] Operating system platform supported by the package. [RepairCommandLine] Value of the Repair command lineproperty in theProgramstab underDeployment Datatab.[Language] Value of the Languageproperty in thePackage Informationtab.[PackagePublishFolder] Path to the folder where the package copied during publish. [TransformFilePath] Value of the Transformsproperty in thePackage Informationtab.[IconPath] Value of the Icon fileproperty in theGeneral Informationtab.[SetupType] Package type extension. For Examples: MSI, EXE, etc noteEnter the script parameters in comma-separated format with no gap:
For Example: -ProductName [ProductName],-Vendor [Vendor],-Version [Version]
If you use any other delimiter than comma, an error message will be generated.
-
(ConfigMgr Distribution Plugin only) Under Script Information:
-
In the Script File field, click Browse and select the script file (.ps1) that you want to add. This is an optional field.
noteIt is required that the specified PowerShell script file must be accessible for the AdminStudio installed machine.
noteThe specified PowerShell script file will be executed on ConfigMgr system after application is published.
-
In the Script Parameters, enter the parameters used in the PowerShell script with the appropriate AdminStudio placeholders. This is an optional field.
-
The Script Parameters field must be used to pass the AdminStudio placeholders value to the parameters in the PowerShell script file. During the execution of the script, AdminStudio will replace the specified parameters with the value of the placeholders for the package being published. The below Table lists all supported AdminStudio placeholders with their values.
Placeholders Values [ProductName] Name of the application node as it appears in the Application tree in the Catalog. [Vendor] Value of the Manufacturerproperty in thePackage Informationtab.[Version] Value of the Software Versionproperty in thePackage Informationtab.[PackagePublishPath] Path to the package file after the copy. [InstallCmdLine] Value of the Install command lineproperty in theProgramstab underDeployment Datatab.[UnInstallCmdLine] Value of the Uninstall command lineproperty in theProgramstab underDeployment Datatab.[Platform] Operating system platform supported by the package. [RepairCommandLine] Value of the Repair command lineproperty in theProgramstab underDeployment Datatab.[Language] Value of the Languageproperty in thePackage Informationtab.[PackagePublishFolder] Path to the folder where the package copied during publish. [TransformFilePath] Value of the Transformsproperty in thePackage Informationtab.[IconPath] Value of the Icon fileproperty in theGeneral Informationtab.[SetupType] Package type extension. For Examples: MSI, EXE, etc
noteEnter the script parameters in comma-separated format with no gap:
-
For Example: -ProductName [ProductName],-Vendor [Vendor],-Version [Version]
If you use any other delimiter than comma, an error message will be generated.
-
(ConfigMgr Distribution Plugin only) Under Script Information:
-
In the Script File field, click Browse and select the script file (.ps1) that you want to add. This is an optional field.
noteIt is required that the specified PowerShell script file must be accessible for the AdminStudio installed machine.
noteThe specified PowerShell script file will be executed on ConfigMgr system after application is published.
-
In the Script Parameters, enter the parameters used in the PowerShell script with the appropriate AdminStudio placeholders. This is an optional field.
-
The Script Parameters field must be used to pass the AdminStudio placeholders value to the parameters in the PowerShell script file. During the execution of the script, AdminStudio will replace the specified parameters with the value of the placeholders for the package being published. The below Table lists all supported AdminStudio placeholders with their values.
noteThe Custom Distribution Plugin can be used to publish applications to an endpoint management system that is not supported out-of-the-box by AdminStudio. During publish to a Custom Distribution System, the selected package will be first copied to the shared path specified in the Location to Publish Packages field, and then the PowerShell script file specified in the Script File field will be executed. The PowerShell script can perform any action, which may include importing of the copied package into any end point management system.
-
-
If you want to add another named connection, click New and repeat the above process.
-
Click OK to close the dialog box.
See Also